Spis treści
Raspberry Pi - Moduł Zilog ePIR Alarm
Autor: Marcin Kasiński
15.02.2014 18:07:49 +0200

W niniejszym artykule postaram się opisać wykorzystanie Raspberry Pi oraz czujnika ruchu Zilog ePIR do zbudowania alarmu. Czujnik, przedstawiony na zdjęciu obok, to ePIR SEN-09587 jeszcze niedawno możliwy był do kupienia w sklepie sparkfun. Obecnie wycofany on jest ze sklepu sparkfun, ale można go kupić na aukcjach internetowych. Do obsługi czujnika stworzyłem dedykowaną aplikację JAVA wykorzystującą bibliotekę Pi4J. Aplikacja reaguje na zdarzenia generowane przez czujnik w momencie detekcji ruchu, które to zdarzenia będą powodowały wysyłanie emaila na zadany adres. Jako , że zaobserwowałem czasami alarmy "nieprawdziwe" do aplikacji wprowadziłem poprawkę generującą powiadomienie w momencie pojawienia się kilku zdarzeń następujących po sobie.
W przedstawionym rozwiązaniu potrzebne nam będzie:
- Moduł Raspberry Pi
- Moduł Zilog ePIR SEN-09587
- Biblioteka Pi4J
Podłączenie Raspberry Pi z ePIR
Fizyczne rozstawienie pinów Raspberry Pi zgodnie z opisem ze strony http://elinux.org/RPi_Low-level_peripherals przedstawia poniższe zdjęcie.
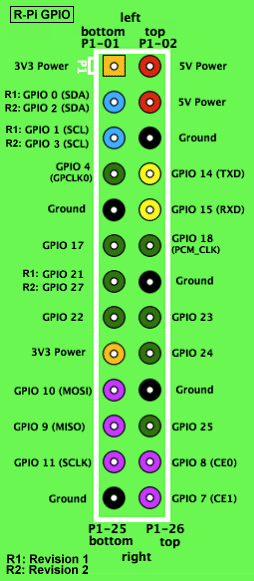
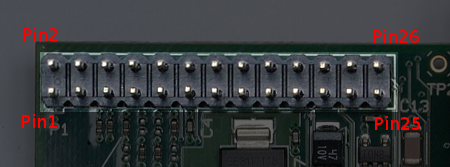
Sposób odszukania konkretnego pinu w urządzeniu przedstawia poniższa grafika.
Rozstawienie pinów Raspberry Pi (dla biblioteki Pi4j) wygląda inaczej. Trzeba o tym pamiętać pisząc aplikacje z wykorzystaniem biblioteki Pi4j. W bibliotece wykorzystujemy logiczne numery pinów nie odpowiadające ich fizycznemu rozstawieniu.

Poniżej przedstawione jest rozstawienie pinów modułu Zilog ePIR zgodnie ze specyfikacją.
| Pin | Nazwa | Opis |
|---|---|---|
| 1 | GND | |
| 2 | VDD | |
| 3 | RXD/DLY | |
| 4 | TXD/SNS | |
| 5 | MD/RTS | |
| 6 | LG | |
| 7 | SLP | |
| 8 | GND |
Przedstawiony czujnik ePir posiada standard stanów logicznych: 3.3 V i powinien być zasilany napięciem z zakresie od 2.7 V do 3.6 V. Poniższa tabela przedstawia podłączenie Raspberry Pi z ePIR.
| Pin ePIR | pin Raspberry Pi | Opis |
|---|---|---|
| pin 1 | GND | |
| pin 2 | Zasilanie 3.3V | |
| pin 3 | Pin 18 (TX1) | |
| pin 4 | Pin 19 (RX1) + 10k rezystor podciągający | |
| pin 6 | Zasilanie 3.3V |
Instalowanie i przygotowanie środowiska
Pierwszym krokiem jaki należy zrobić jest zainstalowanie obrazu wheezy-raspbian na Raspberry Pi. http://www.raspberrypi.org/downloads . Po zainstalowaniu obrazu na karcie, podłączeniu urządzenia kablem sieciowym do sieci i uruchomieniu Raspbery PI możemy już zalogować się na serwer. Po zalogowaniu wskazane byłoby dokonanie aktualizacji systemu operacyjnego. Dokonujemy tego poprzez polecenia:
sudo apt-get -y update
sudo apt-get -y upgrade
Konfiguracja komunikacji Serial
Czysty system operacyjny linux oparty na wheezy-raspbian wymaga jeszcze skonfigurowania komunikacji szeregowej. W tym celu po zalogowaniu się na konto root należy wyedytować plik /boot/cmdline.txt . W nim należy zamienić linię
dwc_otg.lpm_enable=0 console=ttyAMA0,115200 kgdboc=ttyAMA0,115200 console=tty1 root=/dev/mmcblk0p2 rootfstype=ext4 elevator=deadline rootwait
na
dwc_otg.lpm_enable=0 console=tty1 root=/dev/mmcblk0p2 rootfstype=ext4 elevator=deadline rootwait
Po tej modyfikacji trzeba zrobić restart maszyny. Po restarcie i po zalogowaniu się na konto root należy wyedytować plik /etc/inittab W nim należy zamienić linię
T0:23:respawn:/sbin/getty -L ttyAMA0 115200 vt100
na
#T0:23:respawn:/sbin/getty -L ttyAMA0 115200 vt100
Po powyższych operacjach i po restarcie Raspberry Pi mamy skonfigurowaną komunikację szeregową.
Konfiguracja Wifi
W przypadku kiedy chcemy w Raspberry Pi korzystać z wifi po zakupieniu modułu wifi i podłączeniu poprzez USB należy w systemie skonfigurować wifi. W tym celu należy wyedytować plik /etc/wpa_supplicant/wpa_supplicant.conf Plik ten powinien mieć postać jak poniżej (w moim przypadku dla komunikacji WPA2)
ctrl_interface=DIR=/var/run/wpa_supplicant GROUP=netdev
update_config=1

network={
    ssid="SSID sieci WIFI do której chcemy się łączyć"
    proto=RSN
    key_mgmt=WPA-PSK
    pairwise=CCMP TKIP
    group=CCMP TKIP
    psk="hasło do sieci"
}
Oczywiście w nim należy odpowiednio ustawić parametr ssid oraz psk. Po zapisie tego pliku należy tylko zrobić restart sieci
sudo /etc/init.d/networking restart
Aplikacja - development
W tym momencie możemy przejść do pisania aplikacji JAVA realizującej kluczową funkcjonalność. Aplikacją będzie nasłuchiwała na zdarzenia czujnika i po nadejściu zdarzenia stwierdzającego ruch (kilku takich zdarzeń następujących po sobie) Pierwszy plik to Epir.java . To główny program zajmujący się komunikacją z czujnikiem.
package mk;

import java.io.BufferedWriter;
import java.io.FileInputStream;
import java.io.FileNotFoundException;
import java.io.FileOutputStream;
import java.io.IOException;
import java.io.OutputStreamWriter;
import java.io.PrintWriter;
import java.lang.management.ManagementFactory;
import java.security.acl.LastOwnerException;
import java.util.Calendar;
import java.util.Date;
import java.util.Properties;

import javax.management.MXBean;

import com.pi4j.io.gpio.GpioController;
import com.pi4j.io.gpio.GpioFactory;
import com.pi4j.io.gpio.GpioPinDigitalOutput;
import com.pi4j.io.gpio.PinState;
import com.pi4j.io.gpio.RaspiPin;
import com.pi4j.io.serial.Serial;
import com.pi4j.io.serial.SerialDataEvent;
import com.pi4j.io.serial.SerialDataListener;
import com.pi4j.io.serial.SerialFactory;
import com.pi4j.io.serial.SerialPortException;

import org.apache.log4j.Logger;

public class Epir {

	Properties prop = new Properties();

	static boolean debug = false;

	Logger logger;

	// ile opoźnienia przystarcie
	long start_delay_in_seconds = 60;
	// co ile godzin ma pinga wysyłać
	long ping_interval = 4;
	// co ile minut ma alarm wysyłąć
	long alarm_interval = 10;
	// ilosc wystapien jeden za drugim alarmu po jakim wysylany jest email
	int max_events_count = 3;

	long lastping = 0;
	long lastalarm = 0;

	int current_events_count = 0;

	String email_SMTP_AUTH_USER = null;
	String email_SMTP_AUTH_PWD = null;
	String email_host = null;
	String email_port = null;
	String email_from = null;
	String email_to = null;
	String email_start_message = null;
	String email_ping_message = null;
	String email_alert_message = null;

	public void init() {

		logger = Logger.getLogger("Epir");

		try {
			prop.load(new FileInputStream("config.properties"));

			start_delay_in_seconds = Long.parseLong(prop
					.getProperty("start_delay_in_seconds"));
			ping_interval = Long.parseLong(prop.getProperty("ping_interval"));
			alarm_interval = Long.parseLong(prop.getProperty("alarm_interval"));
			max_events_count = Integer.parseInt(prop
					.getProperty("max_events_count"));

			email_SMTP_AUTH_USER = prop.getProperty("email_SMTP_AUTH_USER");
			email_SMTP_AUTH_PWD = prop.getProperty("email_SMTP_AUTH_PWD");
			email_host = prop.getProperty("email_host");
			email_port = prop.getProperty("email_port");
			email_from = prop.getProperty("email_from");
			email_to = prop.getProperty("email_to");
			email_start_message = prop.getProperty("email_start_message");
			email_ping_message = prop.getProperty("email_ping_message");
			email_alert_message = prop.getProperty("email_alert_message");

			logger.info("Epir Configuration...");

			logger.info("start_delay_in_seconds=" + start_delay_in_seconds);
			logger.info("ping_interval=" + ping_interval);
			logger.info("alarm_interval=" + alarm_interval);
			logger.info("max_events_count=" + max_events_count);

			logger.info("email_SMTP_AUTH_USER=" + email_SMTP_AUTH_USER);
			logger.info("email_host=" + email_host);
			logger.info("email_port=" + email_port);
			logger.info("email_from=" + email_from);

			logger.info("email_start_message=" + email_start_message);
			logger.info("email_ping_message=" + email_ping_message);
			logger.info("email_alert_message=" + email_alert_message);

		} catch (Exception e1) {
			logger.error("error " + e1.getMessage());
		}

		SendSimpleEmail.init(logger, email_SMTP_AUTH_USER, email_SMTP_AUTH_PWD,
				email_host, email_port, email_from, email_to);

		Calendar mCalendar = Calendar.getInstance();

		mCalendar.set(Calendar.MINUTE, 0);
		mCalendar.set(Calendar.SECOND, 0);
		mCalendar.set(Calendar.MILLISECOND, 0);

		lastping = mCalendar.getTimeInMillis();
		lastalarm = 0;

		logger.info("Epir starting in " + start_delay_in_seconds + " seconds");

		try {
			if (debug != true)
				Thread.sleep(start_delay_in_seconds * 1000);
		} catch (InterruptedException e) {

			e.printStackTrace();
		}
		logger.info("Epir started");

		logger.info("ping_interval " + ping_interval + ", alarm_interval "
				+ alarm_interval);

		try {
			if (debug != true)
				SendSimpleEmail.send(email_start_message);
		} catch (Exception e) {

			logger.error(e.getMessage());

		}

	}

	public void generateAlarm() {

		long current = Calendar.getInstance().getTimeInMillis();

		// ile minut od ostatniego pinga
		long last_alarm_interval = (current - lastalarm) / 1000 / 60;

		if (last_alarm_interval >= alarm_interval) {

			try {
				logger.info("Epir Alarm");

				SendSimpleEmail.send(email_alert_message);
			} catch (Exception e) {

				logger.error(e.getMessage());

			}
			lastalarm = current;
		}

	}

	public void generatePing() {

		Calendar mCalendar = Calendar.getInstance();

		long current = mCalendar.getTimeInMillis();

		// ile godzin od ostatniego pinga
		long last_ping_interval = (current - lastping) / 1000 / 60 / 60;

		if (last_ping_interval >= ping_interval) {
			logger.info("last_ping_interval " + last_ping_interval
					+ " ping_interval " + ping_interval + " current " + current
					+ " lastping " + lastping + " mCalendar "
					+ mCalendar.get(Calendar.HOUR_OF_DAY) + " "
					+ mCalendar.get(Calendar.MINUTE) + " "
					+ mCalendar.get(Calendar.SECOND));

			logger.info("Epir Ping");

			try {
				if (debug != true)
					SendSimpleEmail.send(email_ping_message);
			} catch (Exception e) {

				logger.error(e.getMessage());

			}

			mCalendar.set(Calendar.MINUTE, 0);
			mCalendar.set(Calendar.SECOND, 0);
			mCalendar.set(Calendar.MILLISECOND, 0);
			current = mCalendar.getTimeInMillis();

			lastping = current;
		}

	}

	public void start() throws Exception {

		logger.info("START alarm");

		// create an instance of the serial communications class
		final Serial serial = SerialFactory.createInstance();

		try {
			// open the default serial port provided on the GPIO header
			serial.open(Serial.DEFAULT_COM_PORT, 9600);
			logger.info("serial opened");

			for (;;) {

				generatePing();

				try {

					String STATUS_CMD = "a";

					serial.write(STATUS_CMD);

					char redchar = serial.read();

					if (redchar == 'Y') {

						current_events_count++;

						logger.info("Epir activated " + current_events_count
								+ "/" + max_events_count);

						try {

							if (current_events_count == max_events_count) {
								generateAlarm();
								current_events_count = 0;
							}
						} catch (Exception e) {

							logger.error(e.getMessage());

						}

					}// if
					else {
						current_events_count = 0;
					}

				} catch (IllegalStateException ex) {
					ex.printStackTrace();
				}

				Thread.sleep(1000);
			}

		} catch (SerialPortException ex) {
			System.out
					.println(" ==>> SERIAL SETUP FAILED : " + ex.getMessage());
			return;
		}

	}

	public static void main(String[] args) throws Exception {

		Epir epir = new Epir();
		epir.init();

		epir.start();

	}
}
Druga i ostatnia klasą jest SendSimpleEmail.java , klasa używana do wysyłania emaili.
package mk;

import java.util.*;

import javax.mail.*;
import javax.mail.internet.*;
import javax.activation.*;
import javax.mail.Authenticator;
import javax.mail.PasswordAuthentication;

import org.apache.log4j.Logger;

public class SendSimpleEmail {

	static Logger logger;


	static String email_SMTP_AUTH_USER ;
	static String email_SMTP_AUTH_PWD ;
	static String email_host;
	static String email_port;
	static String email_from;
	static String email_to;


	public static void init(
			Logger in_logger,
			String in_SMTP_AUTH_USER,
			String in_SMTP_AUTH_PWD,
			String in_host,
			String in_port,
			String in_from,
			String in_to
)
	{
		logger=in_logger;
		email_SMTP_AUTH_USER=in_SMTP_AUTH_USER;
		email_SMTP_AUTH_PWD=in_SMTP_AUTH_PWD;
		email_host=in_host;
		email_port=in_port;
		email_from=in_from;
		email_to=in_to;


	}

	public static void send(String textMessage) throws Exception {

		Properties properties = System.getProperties();


		properties.setProperty("mail.smtp.host", email_host);
		properties.setProperty("mail.smtp.auth", "true");
		properties.setProperty("mail.smtp.sendpartial", "true");
		properties.setProperty("mail.smtp.starttls.enable", "true");

		properties.setProperty("mail.smtp.port", email_port);

		Authenticator auth = new Authenticator();
		Session session = Session.getDefaultInstance(properties, auth);

		try {

			MimeMessage message = new MimeMessage(session);


			message.setFrom(new InternetAddress(email_from));


			message.addRecipient(Message.RecipientType.TO, new InternetAddress(
					email_to));

			message.setSubject(textMessage);


			message.setText(textMessage);


			Transport.send(message);

		} catch (MessagingException mex) {

			logger.error(mex.getMessage());
		}
	}

	public static class Authenticator extends javax.mail.Authenticator {
		private PasswordAuthentication authentication;

		public Authenticator() {
			String username = email_SMTP_AUTH_USER;
			String password = email_SMTP_AUTH_PWD;
			authentication = new PasswordAuthentication(username, password);
		}

		protected PasswordAuthentication getPasswordAuthentication() {
			return authentication;
		}
	}
}
Aplikacja - wdrożenie
W pierwszej kolejności przygotowujemy odpowiednią strukturę katalogową po zalogowaniu się na konto pi.
mkdir /home/pi/apps/
mkdir /home/pi/apps/RaspberryTester1/
mkdir /home/pi/apps/RaspberryTester1/in/
mkdir /home/pi/apps/RaspberryTester1/bin/
mkdir /home/pi/apps/RaspberryTester1/lib/
mkdir /home/pi/apps/RaspberryTester1/log/
Do katalogu
/home/pi/apps/RaspberryTester1/bin/
przegrywamy skompilowane klasy zgodnie ze strukturą katalogową.
Do katalogu
/home/pi/apps/RaspberryTester1/lib/
przegrywamy potrzebne nam biblioteki jar , tj. pliki jar biblioteki pi4j, mail.jar oraz bibliotekę log4j np. log4j-1.2.16.jar
W aplikacji używamy logowania log4j, więc potrzebujemy pliku konfiguracyjnego.
Plik ten to
/home/pi/apps/RaspberryTester1/in/log4j.properties
.
log4j.rootLogger=INFO, Epir

log4j.appender.Epir=org.apache.log4j.DailyRollingFileAppender
log4j.appender.Epir.File=/home/pi/apps/RaspberryTester1/log/Epir.log
log4j.appender.Epir.DatePattern='.'yyyy-MM-dd
log4j.appender.Epir.layout=org.apache.log4j.PatternLayout
log4j.appender.Epir.layout.ConversionPattern=%d{dd.MM.yyyy HH\:mm\:ss,SSS} [%t] %-5p %c %x - %m%n
Wszystkie parametry aplikacji są zapisywane w pliku konfiguracyjnym /home/pi/apps/RaspberryTester1/in/config.properties .
// czas opoznienia przy starcie
start_delay_in_seconds=30
// co ile godzin ma pinga wysylac
ping_interval = 4
// co ile minut ma alarm wysylac
alarm_interval = 10
// ilosc wystapien jeden za drugim alarmu po jakim wysylany jest email
max_events_count = 3

email_SMTP_AUTH_USER=konto_z_ktorego_beda_wysylane_emaile@gmail.com
email_SMTP_AUTH_PWD=haslo_do_konta_gmail
email_host=smtp.gmail.com
email_port=587
email_from=konto_z_ktorego_beda_wysylane_emaile@gmail.com
email_to=konto_na_ktore_beda_wysylane_emaile@gmail.com

email_start_message=Alarm wystartowany
email_ping_message=Alarm PING
email_alert_message=Ktos sie kreci po domu
Do wystartowania aplikacji przygotowany jest plik /home/pi/apps/RaspberryTester1/in/startclient.sh .
#!/bin/sh


cd /home/pi/apps/RaspberryTester1/in/

#export CP=../lib/pi4j-core.jar
export CP=../lib/*

# plik pid . Standardowe położenie
pidFile="/var/run/alarmservice.pid"

echo "$# arguments were supplied."

echo "pidFile $pidFile"

# skrypt oczekuje 1 parametry
# czy jest parametr z plikiem dla pidu. Jesli jest podmieniana jest zmienna pidFile
if [ -n "$1" ]
then
    pidFile=$1
fi

echo "pidFile $pidFile"

nohup java -cp ../bin:$CP mk.Epir > log.txt 2> errors.txt < /dev/null &
PID=$!
echo $PID > $pidFile
Następną czynnością jest utworzenie serwisu pozwalającego na uruchomieniu naszej aplikacji przy każdym starcie serwera. W tym celu logujemy się na konto root i kopiujemy poniższą zawartość do pliku /etc/init.d/alarmservice .
#! /bin/sh
### BEGIN INIT INFO
# Provides:          skeleton
# Required-Start:    $remote_fs $syslog
# Required-Stop:     $remote_fs $syslog
# Default-Start:     2 3 4 5
# Default-Stop:      0 1 6
# Short-Description: Example initscript
# Description:       This file should be used to construct scripts to be
#                    placed in /etc/init.d.
### END INIT INFO

# Author: Foo Bar <foobar@baz.org>
#
# Please remove the "Author" lines above and replace them
# with your own name if you copy and modify this script.

# Do NOT "set -e"

# PATH should only include /usr/* if it runs after the mountnfs.sh script
PATH=/sbin:/usr/sbin:/bin:/usr/bin
DESC="Description of the service"
NAME=alarmservice
DAEMON=/home/pi/apps/RaspberryTester1/in/startclient.sh
DAEMON_ARGS="--options args"
PIDFILE=/var/run/$NAME.pid
SCRIPTNAME=/etc/init.d/$NAME

# Exit if the package is not installed
[ -x "$DAEMON" ] || exit 0

# Read configuration variable file if it is present
[ -r /etc/default/$NAME ] && . /etc/default/$NAME

# Load the VERBOSE setting and other rcS variables
. /lib/init/vars.sh

# Define LSB log_* functions.
# Depend on lsb-base (>= 3.2-14) to ensure that this file is present
# and status_of_proc is working.
. /lib/lsb/init-functions

#
# Function that starts the daemon/service
#
do_start()
{
	# Return
	#   0 if daemon has been started
	#   1 if daemon was already running
	#   2 if daemon could not be started

	#start-stop-daemon --start --quiet --pidfile $PIDFILE --exec $DAEMON --test > /dev/null \
	#	|| return 1
	#start-stop-daemon --start --quiet --pidfile $PIDFILE --exec $DAEMON -- \
	#	$DAEMON_ARGS \
	#	|| return 2

	$DAEMON

	# Add code here, if necessary, that waits for the process to be ready
	# to handle requests from services started subsequently which depend
	# on this one.  As a last resort, sleep for some time.
}

#
# Function that stops the daemon/service
#
do_stop()
{
	# Return
	#   0 if daemon has been stopped
	#   1 if daemon was already stopped
	#   2 if daemon could not be stopped
	#   other if a failure occurred

	start-stop-daemon --stop --quiet --retry=TERM/30/KILL/5 --pidfile $PIDFILE --name $NAME
	RETVAL="$?"

	[ "$RETVAL" = 2 ] && return 2
	# Wait for children to finish too if this is a daemon that forks
	# and if the daemon is only ever run from this initscript.
	# If the above conditions are not satisfied then add some other code
	# that waits for the process to drop all resources that could be
	# needed by services started subsequently.  A last resort is to
	# sleep for some time.
	start-stop-daemon --stop --quiet --oknodo --retry=0/30/KILL/5 --exec $DAEMON
	[ "$?" = 2 ] && return 2
	# Many daemons don't delete their pidfiles when they exit.

	kill -9 $(cat $PIDFILE)
	rm -f $PIDFILE
	return "$RETVAL"
}

#
# Function that sends a SIGHUP to the daemon/service
#
do_reload() {
	#
	# If the daemon can reload its configuration without
	# restarting (for example, when it is sent a SIGHUP),
	# then implement that here.
	#
	start-stop-daemon --stop --signal 1 --quiet --pidfile $PIDFILE --name $NAME
	return 0
}

case "$1" in
  start)
	[ "$VERBOSE" != no ] && log_daemon_msg "Starting $DESC" "$NAME"
	do_start
	case "$?" in
		0|1) [ "$VERBOSE" != no ] && log_end_msg 0 ;;
		2) [ "$VERBOSE" != no ] && log_end_msg 1 ;;
	esac
	;;
  stop)
	[ "$VERBOSE" != no ] && log_daemon_msg "Stopping $DESC" "$NAME"
	do_stop
	case "$?" in
		0|1) [ "$VERBOSE" != no ] && log_end_msg 0 ;;
		2) [ "$VERBOSE" != no ] && log_end_msg 1 ;;
	esac
	;;
  status)
	status_of_proc "$DAEMON" "$NAME" && exit 0 || exit $?
	;;
  #reload|force-reload)
	#
	# If do_reload() is not implemented then leave this commented out
	# and leave 'force-reload' as an alias for 'restart'.
	#
	#log_daemon_msg "Reloading $DESC" "$NAME"
	#do_reload
	#log_end_msg $?
	#;;
  restart|force-reload)
	#
	# If the "reload" option is implemented then remove the
	# 'force-reload' alias
	#
	log_daemon_msg "Restarting $DESC" "$NAME"
	do_stop
	case "$?" in
	  0|1)
		do_start
		case "$?" in
			0) log_end_msg 0 ;;
			1) log_end_msg 1 ;; # Old process is still running
			*) log_end_msg 1 ;; # Failed to start
		esac
		;;
	  *)
		# Failed to stop
		log_end_msg 1
		;;
	esac
	;;
  *)
	#echo "Usage: $SCRIPTNAME {start|stop|restart|reload|force-reload}" >&2
	echo "Usage: $SCRIPTNAME {start|stop|status|restart|force-reload}" >&2
	exit 3
	;;
esac

:
Następnie wykonujemy poniższe czynności:
chmod a+x /etc/init.d/alarmservice
chmod a+x /home/pi/apps/RaspberryTester1/in/startclient.sh
Ostatnim elementem jest włączenie serwisu.
update-rc.d alarmservice defaults
update-rc.d alarmservice enable
Po wszystkich powyższych zmianach możemy zrestartować Raspberry Pi. Po restarcie aplikacja powinna uruchamiać się automatycznie.
powrótKomentarze
Dodaj Komentarz
Newsletter
Jeżeli chcesz być na bieżąco informowany o aktualnościach i poradach IT zapisz się do naszego newslettera.
